This section is under construction.
Because this page is a compilation of all sections from the Country Localisation, please pay attention to the links that will open the single section that it references.
Web Application localisation
WA1. Procure Windows-based Server
The minimum requirement to install and use openIMIS in a production environment are: Windows Server 2016 2 core CPU 8 GB RAM 100 GB Hard drive Administrator privileges You can acquire a VPS from any hosting provider (e.g. Azure, AWS) or create your own server backbone. For development and testing purposes, please follow the minimum requirements on the following tools: Visual Studio 2017 minimal requirements (for other versions please check on Microsoft website)Minimum requirements
WA2. Set up the default openIMIS instance
To set up the default openIMIS instance, please follow the steps: If you want to start to localise openIMIS Web Application first and install the localised version afterwards, you can directly start from the localisation of the Web Application at the source code level.
WA2.1 Database installation
openIMIS has been developed and tested using SQL Server 2017. Newer or old versions might require adaptations to both these installation guide and openIMIS code. Download the desired version of SQL Server (for example, if you want to test openIMIS, you can download and install SQL Server 2017 Developer version - not for production When the installation wizard opens, select the manual configuration option in order to fine-tune the installation process. On the Features selection: In For installations with Data Warehouse, select On the Instance configuration, the default name On Database engine configuration, select Continue the setup process until the installation is complete. Open the SQL Server Configuration Manager On the left panel, select Select SQL Server Services → right-click on SQL Server instance name and select Restart To facilitate the setting up of the openIMIS database, we suggest installing SQL Server Management Studio (SSMS). The following procedure is based on SSMS, but you can use the standard SQL Server prompt to proceed with the setup. First, download the openIMIS database SQL files and migration scripts from Github repository (the source code ZIP file). If you wish to initialize the database using SSMS, follow the steps: Create a new database for the openIMIS instance (e.g. openIMIS.1.4.0, where 1.4.0 is the openIMIS database version). Open the openIMIS_ONLINE.sql file (from the Empty databases folder) and execute the script (make sure the selected database is the one created in step a.) If you prefer to initialize the database using the shell: Be careful to adapt the queries to your setup, in the command lines example those assumptions were made: The database is called IMIS_DATABASENAME The SQL server is called SQL_Server_Name Run the following commands: Create a dedicated user with full privilege on the openIMIS database only: In the Security → Logins → right-click and select “New Login…” In General page: Give a login name (e.g. ImisUser) Select SQL Server authentication and provide a password Unselect Enforce password expiration Change the default database to openIMIS In User Mapping page: Map openIMIS database to ImisUser user Give the role of db_owner There are three specific openIMIS databases to chose from: Offline (openIMIS_OFFLINE.sql): this mode is used for remote insurance offices without Internet connectivity. Note: the synchronization of data with the central server is manual. Offline HF (openIMIS_OFFLINE_HF.sql): this mode can be used in remote health facilities without Internet connectivity. Note: the synchronization of data with the central server is manual. Demo (openIMIS_demo_ONLINE.sql): this script initialize the empty database with the demo dataset. To initialize one of the specific openIMIS databases, follow the steps: Initialize the openIMIS database by following the previous section steps Run the specific database script on the already initialized openIMIS database The upgrading process should always be performed on a copy of the database to ensure the proper execution of the migration script. In case of any issue arriving from the upgrading process, you can get back to the previous version of the database. Please report using openIMIS Service Desk any issue you may face in the upgrading process. The upgrade can be done with SQL Server Management Studio (SSMS) or from the shell (be careful to adapt the querries to your setup). To update a production instance and to prevent impacting the production if the migration script failed because of customizations in your openIMIS instance: During the upgrade make sure the is not reachable from the applications (you should stop the openIMIS website in Web Application IIS). Duplicate the database using SSMS or shell (create a full backup of the database and restore it with another database name, e.g. openIMIS.1.4.0) Shell commands (e.g. duplicate 'openIMIS.1.3.0' database to 'openIMIS.1.4.0' database; please adapt to your situation): Download the openIMIS database SQL files and migration scripts from Github repository (the source code ZIP file). Execute the migration script on the copy of the database in SSMS or shell Shell command (e.g. from the current version 1.3.0 to the new version 1.4.0) Configure the openIMIS Web Application to use the newly migrated database (e.g. openIMIS.1.4.0). Configure the openIMIS Backup Windows Service or your own backup application/service to use the newly migrated database (e.g. openIMIS.1.4.0). Start your openIMIS website.Install SQL Server
![]() ).
).Shared Feature section, select SQL Client Connectivity SDKAnalysis Services, Reporting Services and Integration Services (not available for the Express edition)SQLEXPRESS can be used, unless it is already used by another instance.Mixed Mode (SQL Server authentication and Windows authentication) in Authentication Mode.Configure SQL Server
SQL Server Network Configuration → Protocols for SQLEXPRESS (or the name of your SQL Server instance) → Enable Named Pipes and TCP/IPInitialize openIMIS database
SqlCmd -E –Q "CREATE DATABASE IMIS_DATABASENAME"
SqlCmd -E -S SQL_Server_Name -d IMIS_DATABASENAME –i X:\PathToSQLFile\openIMIS_ONLINE.sql
Initialize specific openIMIS database
Upgrade the openIMIS database
SqlCmd -E -S SQL_Server_Name –Q "BACKUP DATABASE [openIMIS.1.3.0] TO DISK='X:\PathToBackupLocation\openIMIS.1.3.0.bak'"
SqlCmd -E -S SQL_Server_Name –Q "RESTORE DATABASE [openIMIS.1.4.0] FROM DISK='X:\PathToBackupLocation\openIMIS.1.3.0.bak' WITH MOVE 'openIMIS.1.3.0' TO 'C:\Program Files\Microsoft SQL Server\MSSQL14.MSSQLSERVER\MSSQL\DATA\openIMIS.1.4.0.mdf', MOVE 'openIMIS.1.3.0_log' TO 'C:\Program Files\Microsoft SQL Server\MSSQL14.MSSQLSERVER\MSSQL\DATA\openIMIS.1.4.0_log.ldf'"
SqlCmd -E -S SQL_Server_Name -d openIMIS.1.4.0 –i "X:\PathToMigrationScript\openIMIS migration v1.3.0 - v1.4.0.sql"
WA2.2 Web Application installation
In Windows Server, follow these steps to install IIS: In the Select Select your server from the server pool, and select your server from the list In In Select Select In In In In Click on Install and wait for the features to be installed Restart the server if required Download and unzip the release from Github web_app_vb repository into a new folder under the IIS wwwroot (e.g. C:\inetpub\wwwroot\openIMIS.1.4.0). The configuration of IIS done through Internet Information Service (IIS) Manager. Add a site In Internet Information Service (IIS) Manager: Select your server name → Remove the Default Web Site (if new installation) Right-click on Enter a site name for your openIMIS instance (e.g. openIMIS.1.4.0) Enter or select the physical pathname (e.g. C:\inetpub\wwwroot\openIMIS.1.4.0) If you have an SSL certificate, select binding type to HTTPS (port 443) and select your certificate If you don't have an SSL certificate, select binding type to HTTP (port 80) If you have selected the binding type to HTTPS (port 443), then you will have to add also the binding type for HTTP Right-click on the new added website Select Edit Bindings Select binding type HTTP (port 80) and click ok If you have a DNS address (e.g. demo.openimis.org) that is mapped to your server IP address, you can add it in the site binding configuration as the hostname. This will allow having multiple Sites deserving same ports (80 and 443) and can be used to have, for example, openIMIS development (e.g. dev.openimis.org) and production (e.g. demo.openimis.org) sites on the same server. Globalisation Depending on the server’s initial configuration, the date format may differ from the expected The web.config provides the configuration for openIMIS Web Application, including database connection string and necessary folders. To configure the database connection string, go in openIMIS root folder (e.g. C:\inetpub\wwwroot\openIMIS.1.4.0), locate the web.config file and edit Other configuration settings can be found within the In openIMIS root folder (e.g. C:\inetpub\wwwroot\openIMIS.1.6.0), IIS_IUSRS need to be given full control of the following folders: Repeat the following steps for each folder listed above: Right-click on the folder and select properties Ensure that the folder is not read-only Select the Click on Select Then apply and click OK. This can also be done automatically for all the above mentioned folders by running the provided Click on the Windows Start menu of run In the Registry Editor, select Right-click on the Now repeat the same steps for Additional resources: Open your Internet browser and type the following URL in the browser address bar: http://localhost/ You can connect with the following credentials: If you have initiated the openIMIS Blank Database: Login name: Password: If you have initiated the openIMIS Demo Database: Login name: Password: Install IIS
Server Manager → Dashboard → Add Roles and FeaturesRole-based or feature-based installationServer Roles → select Web Server (IIS) → Add FeaturesFeatures.NET Framework 3.5.NET Framework 4.6 and ASP.NET 4.6 (or later)Web Server Role (IIS) → Role ServicesWeb Server, ensure that Common HTTP Features → Static Content is tickedApplication Development, select .NET Extensibility, ASP, ASP.NET, ISAPI Extensions, ISAPI Filters and Websocket ProtocolManagement tools, tick all boxesDownload openIMIS Web Application
Configure IIS
SitesSites → Add WebsiteDD/mm/YYYY format. To force the date format, go to the openIMIS site, then select Culture → .NET Globalisation, and select English (United Kingdom) (en-GB) as a culture.Configure openIMIS Web Application
Edit the web.config
IMISConnectionString entry so that the connection string points to the database created in openIMIS database section with the right credentials. For example:<connectionStrings>
<add name="IMISConnectionString" connectionString="Data Source=WIN-H4E4ARREBFH\SQLEXPRESS;Initial Catalog=openIMIS.1.4.0;User ID=ImisUser;Password=password1234" providerName="System.Data.SqlClient" />
</connectionStrings>
<appSettings> tag and should be modified with caution.Assign permission to source folders
Archive, Extracts, FromPhone, Images, Workspace.Security tabEditIIS_IUSRS and allow full control (in the below section).set_folders_rights.ps1 script from a PowerShell console with Administrator rights (right click on PowerShell shortcut and select Run as administrator.Edit permissions to Windows event logs
Regedit via the search box:HKEY_LOCAL_MACHINE → System → CurrentControlSet → Services → Eventlog.EventLog node, select Permission. Give full permissions to IIS_IUSRS, as described in the above paragraph (Assign permission to source folders). If the IIS_IUSRS user is not present in the list, then click Add button to add it manually. Eventlog → Security and Eventlog → State node, as it can be required depending on the server’s environment.Open the application
AdminAdminAdminadmin123
WA2.3 Windows Services installation
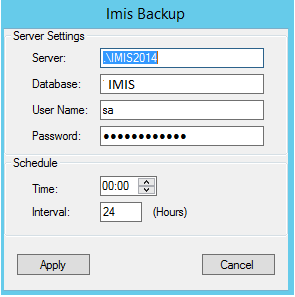
The following Windows Services are available: Policy Renewal service: periodically marks the policies that will expire in the near future to be renewed and updates the status of the already expired policies The openIMIS Windows Services are helping with the periodic activities which are required by the implementations. Backup service: periodically creates a backup of the database To install the Windows Service, proceed as follows for each Service: Download and unzip the installation setup from the links mentioned in the available Services Double click on the setup file Select the installation path (for example Close after the installation completes The installed Service should start automatically as indicated in the system tray. If not, browse to Programs menu and search for the Service name (the controller of the service) and execute it. To fix initial configuration files: Run IMIS Policy Renewal (if an error window appears, click Continue) Right-click the Policy Renewal icon in the system tray (lower-right corner of Windows) and click Fill the newly-created window Server: Database: User Name: Password: Time: Interval: Untick all Click Apply Make a copy of the file ImisPolicyRenewal.exe.config inside C:\Program Files\openIMIS\Windows Services within the same folder Rename the copy into ImisBackup.exe.config To fix service startup: Run Services Locate Double-click the said entry Click the Select the Tick the Click Right-click the said entry Click either Locate its icon in the system tray (lower-right corner of Windows) Right-click the said icon and click Fix field values, if needed This service is used to update insurance policies and runs every day at the specified time. It will do the following actions: If it finds a policy which is about to expire within a specified period of time, it flags it as to be renewed. The list of policies to be renewed can be used by the Enrolment Officers to contact the concerned families. The default policy expiring period of time is 14 days. Sets the policy status to expired to all policies that have expired in between this Service runs. Sends SMS to insuree if their policy is about to expire so that they can renew the policy (optional). After the service installation, the user has to set the name of the server, the database name, the SQL-server instance credentials, and the service schedule for checking which policy is to be flagged as expired policy. The days specified before the exact policy expiry date is provided in the table Under the SMS gateway setting, you need to specify the URL given by SMS Gateway provider. You also need to provide the username and password to allow the service to send SMS to the insuree. This service is used for database backup, after the service installation, the user has to set the name of the server, the database name, the SQL-server instance credentials, and the service schedule for the backups. The backup location is specified in the table tblIMISDefaults under openIMIS Live database. The figure below shows the interface for the database backup service.Install Windows Services
C:\Program Files\openIMIS\Windows Services), and click NextFix broken services
SettingsImis Renewal Policy as follows (please adapt to your situation):.\SERVERNAMEopenIMIS.1.3.0 ImisUserPa$$w0rd00:0024Send SMS to... optionsImisBackup and ImisPolicyRenewal, and do the following for each:Log On tabLocal System account optionAllow service to interact with desktop checkboxOKRestart or Start (whichever is possible)SettingsConfigure the ImisPolicyRenewal Windows Service
tblIMISDefaults under openIMIS Live database. The figure below shows the interface for policy renewal service.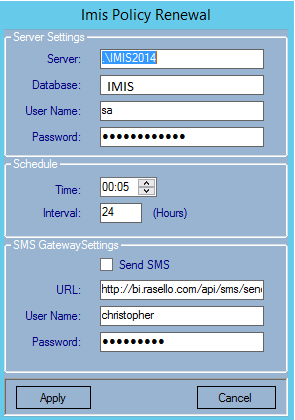
Configure the ImisBackup Windows Service
WA3. Localise openIMIS at Web Application's source code level
If you want to localise openIMIS Web Application component, you will need first to download the source code for the Web Application from Github. The .NET Web Application has been developed to be used in different insurance contexts and with the idea of minimal adaptations. Most of the configuration is saved in the database. However, there are some specific requirements that will have to change the Web Application's source code. The .NET Web Application can be customised as follows:
WA3.1 Escape procedures
The role of the Escape procedures is to allow adaptation of the Web Application to different insurance contexts. There are situated in a single class, EscapeBL, which makes it easier to access and modify without having to worry about messing with the whole Web Application source code. To modify the escape procedure, first download the source code from Github Web Application repository. Within the solution, go to IMIS_BL folder and open the EscapeBL.vb file. There are 2 escape procedures that can be modified: isValidInsuranceNumber allows validating the insuree number based on predefined rules. It is used, for example, when a new family or insuree are enrolled in openIMIS to ensure insuree number validity and to prevent typing errors. SendSMS allows sending SMS messages through a specific SMS Gateway. It is used, for example, in Web Application Policy Renewal form to send the renewal SMS message to the family. Localise the insuree number validation escape procedure In this guide, we will localise the isValidInsuranceNumber method. Parameters Returns InsuranceNumber String Boolean This is the generic implementation of the method: The generic method is returning always true, meaning any insuree number will be a valid one. Let's take for example the following insuree number requirements: The insuree number must follow the modulo 9 rule: the last digit is the modulo 9 of the number without the last digit The insuree number must have 10 digits ('0' at the beginning must be saved) These requirements are satisfied by the following escape procedure: The isValidInsuranceNumber is executing the following steps: validates the length of the insuree number (line 2) splits the insuree number into number and modulo parts (lines 3 and 4) validates the insuree number if the modulo part is equal to the modulo result (line 5) all other cases are invalidated (line 6) Other validations rules can be applied. To apply the new modification to the escape procedures, the Web Application .Net solution needs to be published and deployed.
the insuree number to validate
true if the insuree number is valid; otherwise, falsePublic Function isValidInsuranceNumber(ByVal InsuranceNumber As String) As Boolean
Return True
End Function
Public Function isValidInsuranceNumber(ByVal InsuranceNumber As String) As Boolean
    If Not InsuranceNumber.ToString.Length = 10 Then Return False
    Dim N As String = Left(InsuranceNumber.ToString, 9)
    Dim Modulo As String = Right(InsuranceNumber.ToString, 1)
    If Modulo = N - (Int(N / 9) * 9) Then Return True
    Return False
End Function
WA3.2 Language translation
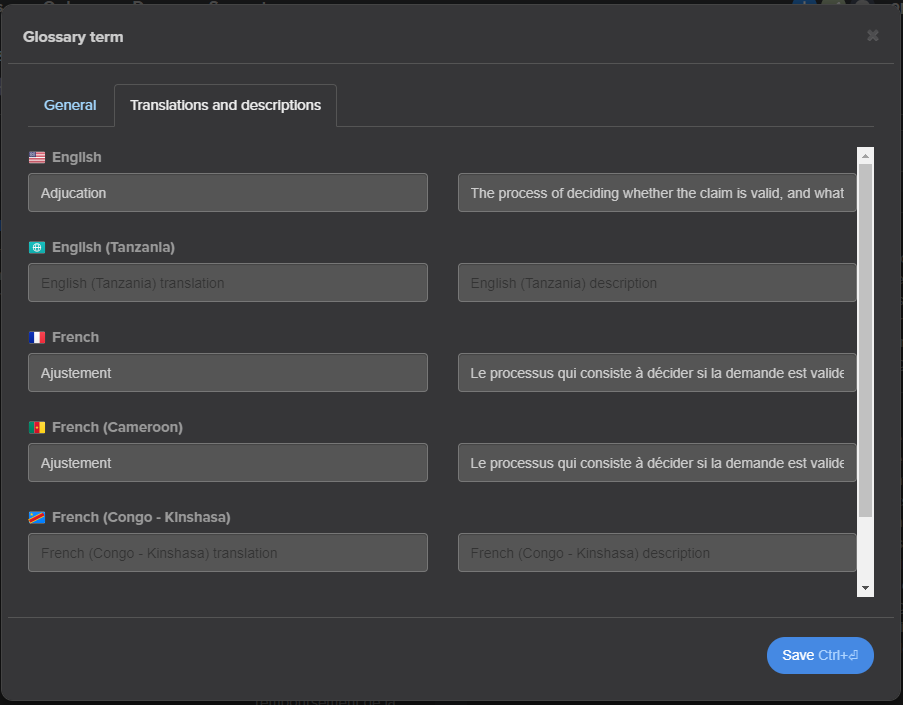
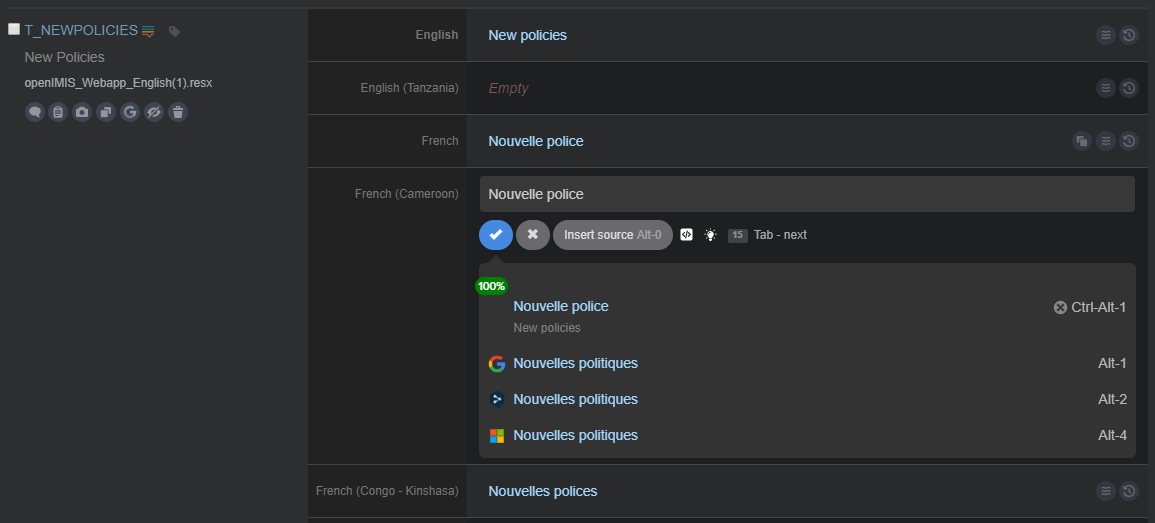
Web Application .Net is supporting up to two languages. The language translation is done on the Web Application source code level (this page) and on the database level (see WA4.1 Language selection and translation tables). The Web Application language localisation is using the default ASP.Net Globalization and Culture configuration. The translation is based on resource files. The generic application is translated into English-language and French-language. In order to facilitate the translation of the Web Application and to have a common repository for language packs for openIMIS, we have subscribed to lokalise.com. If you wish to add new languages to openIMIS Web Application, you can request the access by visiting the Web Application project on lokalise. For more information on the translation platform please check Translation Management platform page. Add a new language for Web Application in lokalise Add new language to the project From the Web Application project press the From the Click the Add button. Translate the glossary to the new language From the Web Application project press the For each glossary term, translate in the new added language Translate the Web Application into the new language For each term in the Web Application project, translate it in the new language Export the language as .Net resource file From the Web Application project press the Select the language you want to download and the different download settings Press Add the new language in the Web Application project Open in Visual Studio the Web Application .Net solution downloaded from Github In the Select Select the resource file for the new language and press (Optional) you can check the new language by opening the resource file. To use the new language, the Web Application .Net solution needs to be published and deployed. Nevertheless, you cannot use the new language unless you update the language selection and translation tables in the database. Why Glossary is important Because there is multiple truth and it is often complex and can change over time, the terminology must have the same meaning and same wording in the whole Web Application. It is also important that the country-specific names are validated by the country implementing openIMIS. When using a glossary you ensure that you will use the same 'truth' across your application. In the case of lokalise, every time it will detect the glossary term, it will show the definition and the translation, allowing to be consistent in the translation package. For example, in Tchad there are the different organisation names which must be adapted in openIMIS: openIMIS default name Tchad official old name Tchad official new name Tchad health zones Regions Région Province Délégation Sanitaire Provinciale District Prefecture Département District sanitaires Municipality Sous-préfecture Commune Zone de résponsabilité Village Village Village Village![]()
+ button to add a new language
Add languages modal select the language to add. You can filter the languages by writing in the input field. In this example, we will choose French (Cameroon). Multiple languages can be added at once.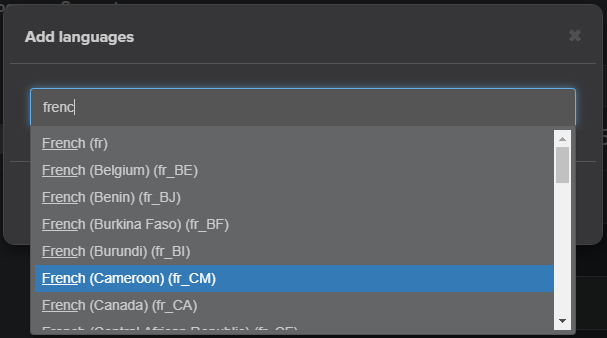
Glossary button to add a new language
Download button
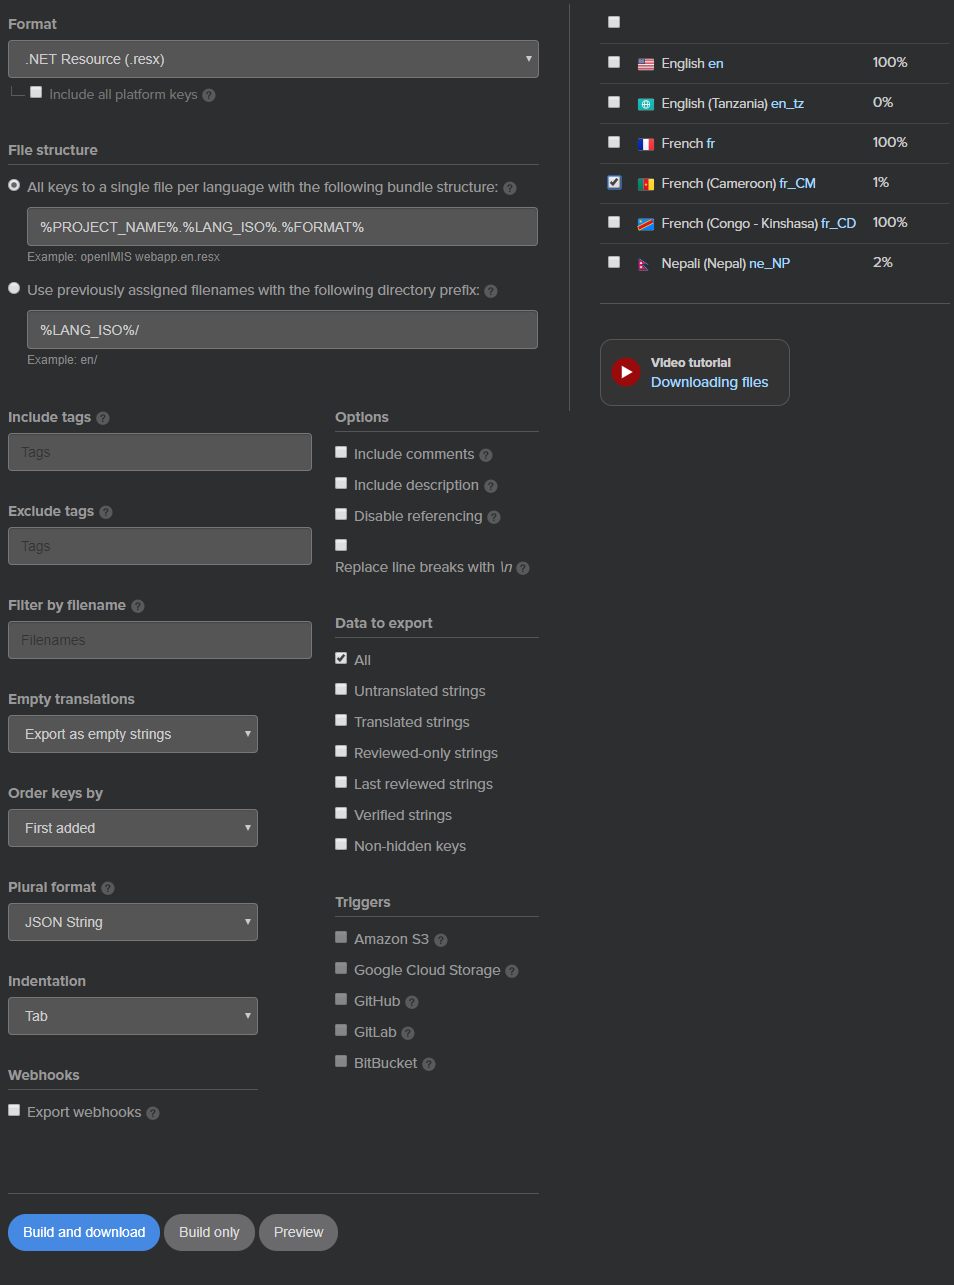
Build and download button. This will download a ZIP file with resource files for all selected languages. Unzip Solution Explorer window, navigate to IMIS project → App_GlobalResources folder and open the contextual menu with right-click Add → Existing Item...Add. This will copy the file to the App_GlobalResources folder and add it to the project.
WA3.3 Deploy the customised Web Application
WA4. Localise openIMIS at the database level
Some of the configuration/localisations of the Web Application can be done in the openIMIS database: mandatory if you change the default translation languages or optional for user interface configuration and default configuration. In this section, we will localise openIMIS on database level:
WA4.1 Language selection and translation tables
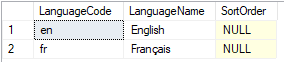
In language translation section, we have added another language to the Web Application as a resource file. However, you cannot use the new language unless you add this language as an option in the database. In addition to this, you will need to customise and translate the dropdown lists to have a completely translated version of openIMIS. To facilitate the customisation and the translation of the dropdown list in openIMIS database, we suggest installing SQL Server Management Studio (SSMS). The following procedure is based on SSMS, but you can use the standard SQL Server prompt to proceed with the setup. Customisation and translation of the dropdown list Before configuring the available languages in openIMIS, lets first add the translation for the different dropdown list. openIMIS is using dropdown lists in both Web Application and mobile applications to allow users to modify entities attributes. The following tables contain dropdown translations: Table name Entity attribute Default values Description tblConfirmationTypes Family.ConfirmationType Local council Municipality State Other The type of confirmation of the social status of the family. tblEducations Insuree.Education Nursery Primary school Secondary school University Postgraduate studies PHD Other The level of education of the insuree. tblFamilyTypes Family.Type Council Organization Household Other Priests Students Teachers The type of family. tblGender Insuree.Gender Female Male Other The gender of the insuree. tblHFSublevel HealthFacility.SubLevel Integrated No Sublevel Reference The sub-level of a health facility. Level are: Dispensary Health Center Hospital tblIdentificationTypes Insuree.IdentificationType Driver's License National ID Passport Voter Card The type of identification document the insuree provided during the enrolment process. tblLegalForms HealthFacility.LegalForm Charity District organization Government Private organization The legal form of the health facility. tblPayerType Payer.Type Co-operative Donor Government Local Authority Other Private Organization The type of payer. A payer can pay the contribution for a family or group. tblProfessions Insuree.Profession Housewife Employee Self Employee Others The profession of the insuree. tblRelations Insuree.Relationship Brother/Sister Father/Mother Uncle/Aunt Son/Daughter Grand parents Employee Others Spouse The relationship of the insuree to the head of the insured family. For example, the Education dropdown list from the Web Application's Add Family form allows to chose the family head's level of education. There are two advantages of having the dropdown list options in the database: it is easier to translate without publishing again the applications it is easier to add or remove options based on the scheme/implementation/country requirements The downside of this is the limit to the number of languages that can be supported. All dropdown translation tables have the following structure: Column Name Data Type Description Id smallint The identifier of the dropdown option FirstLanguageTerm nvarchar(50) The dropdown option term in the first language (English by default) SortOrder int Position of the option in the dropdown AltLanguage nvarchar(50) The dropdown option term in the alternative/second language (French by default) This structure allows only two languages to be used in openIMIS. For example, in Tanzania, the two languages are English and Swahili. Because the available dropdown options depend on the scheme/implementation/country requirements, the customisation of the dropdown lists is part of the scheme configuration. Language selection configuration The available languages that can be selected in the Web Application and mobile applications are configured in the tblLanguages table in the openIMIS database. As we have seen in the previous section, the dropdown translation tables are limiting the number of available languages to two. In case you added another language in the Web Application source code, you will need to replace here one language with the new one (usually second language). The following structure is presented in the languages table: Column Name Data Type Description LanguageCode nvarchar(5) The identifier of the language. LanguageName nvarchar(50) The language name that will be displayed in Web and Mobile Applications SortOrder int Position of the option in the language selection dropdown Please pay attention to the LanguageCode. It represents language code used for the Web Application resource files (e.g. Resource.fr.resx). If you use Lokalise, the code is represented by the %LANG_ISO% code of the translation language (fr_CM for the Cameroon example). The length of the LanguageCode has been updated in October 2019 release to allow ISO 639 and ISO 3166 coding (e.g. fr_FR).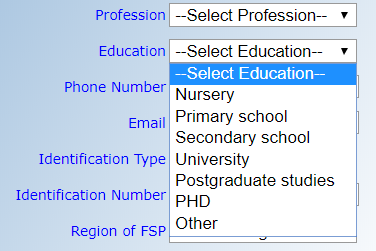
WA4.2 Control table
The openIMIS database's tblControls table allows configuring specific forms in both Web Application and Mobile Applications. This configuration will be based on the requirements of the implementation site. For selected forms, some fields can have the following attributes: Value Meaning Description O Optional The field can be empty on form submission M Mandatory The field is mandatory and could not be empty on form submission N Hidden The field is not displayed in the form and will be empty on form submission R Required The field has a required condition. Only for TotalAmount control. The following fields can be localised. Note: the field names are the same as named in the tblControls table. Field Name Default Forms Description BeneficiaryCard Optional Family, Insuree List of options (dropdown) whether or not a card was issued to the Insuree ClaimAdministrator Mandatory FindClaim, Claim, ClaimReview, ClaimFeedback Displays code of the claim administrator. Confirmation Optional Family, Insuree, OverviewFamily, ChangeFamily List of confirmation types to select the social status of the family/group (see WA4.1 Language selection and translation tables) ConfirmationNo Optional Family, Insuree, FindFamily, OverviewFamily, ChangeFamily Alphanumeric identification of the confirmation of the social status of the family/group ContributionCategory Optional Premium, FindPremium List of contribution categories to select the category of the contribution of the family/group CurrentAddress Optional Family, Insuree Details of the temporal address of the Insuree CurrentDistrict Optional Family, Insuree List of available regions and available districts in the selected region, to select the district in which the insuree temporarily stays CurrentMunicipality Optional Family, Insuree List of available municipalities in the selected district, to select the municipality in which the insuree temporarily stays CurrentVillage Optional Family, Insuree List of available villages in the selected municipality, to select the village in which the insuree temporarily stays Education Optional Family, Insuree List of available educations to select the education of the insuree (see WA4.1 Language selection and translation tables) FamilyType Optional Family, ChangeFamily List of available families/groups types to select the type of group/family (see WA4.1 Language selection and translation tables) FSP Optional Family, Insuree List of available Health Facilities in the selected FSP District and FSP Category, to select the First Service Point FSPCategory Optional Family, Insuree List of available FSP Categories in the selected FSP District, to select the First Service Point category FSPDistrict Optional Family, Insuree List of available FSP District, to select the First Service Point district GuaranteeNo Optional Claim, ClaimReview Identification of a guarantee letter for prior approval of the provision of claimed health care IdentificationNumber Optional Family, Insuree Alphanumeric identification of the document of the Insuree IdentificationType Optional Family, Insuree List of document identification types of the Insuree (see WA4.1 Language selection and translation tables) InsureeEmail Optional Family, Insuree, FindFamily The e-mail address of the Insuree MaritalStatus Optional Family, Insuree List of available marital statuses to select the marital status of the Insuree PermanentAddress Optional Family, Insuree, ChangeFamily Details of the permanent address of the family/group Poverty Optional Family, Insuree, Policy, Premium, FindFamily, ChangeFamily Select whether the family/group has the poverty status Profession Optional Family, Insuree List of available marital statuses to select the marital status of the Insuree(see WA4.1 Language selection and translation tables) Relationship Optional Insuree List of available relationships to select the relationshipsof the Insuree to the head of family/group (see WA4.1 Language selection and translation tables) TotalAmount Required Policies App If the contribution can be added in one installment or multiples.
WA4.3 IMIS default configuration
The openIMIS database's tblIMISDefaults table allows configuring specific forms in both Web Application and Mobile Applications. This configuration will be based on the requirements of the implementation site. The field names from the next table are the same as the one from the tblIMISDefaults table. Some attributes are deprecated and will be removed from the table. The deprecated attributes are not displayed in the following list. The following attributes can be configured: Attribute Type Default Description PolicyRenewalInterval int 14 The number of days in the future that will be considered to mark Policies for renewal by the openIMIS Renewal Windows Service AppVersionBackEnd decimal(3, 1) 0.0 The version of the Web Services AppVersionEnroll decimal(3, 1) 0.0 The version of the Policies mobile application AppVersionClaim decimal(3, 1) 0.0 The version of the Claims mobile application OffLineHF int 0 1 if the Web Application is an offline version of the Health Facility (manage claims) DatabaseBackupFolder nvarchar(255) "" The default folder where the openIMIS Backup Windows Service is saving the backup files OfflineCHF int 0 1 if the Web Application is an offline version of the Insurance implementation (manage enrolment) AppVersionImis decimal(3, 1) 0.0 The version of the Web Application APIKey nvarchar(100) "" The REST API token to be used during calls from Web Application
WA5. Web Application configuration
The following sections present the configuration that can be done within openIMIS Web Application that is not insurance related configuration. Configure the Email settings When users forget their password and request a new password, an email is sent to validate the new credentials. In openIMIS, the following roles can change the email settings: IMIS Administrator, HF Administrator and Offline Administrator. To change the email settings, go to the menu Tools → Email Settings. The information in the following image is fictive. In the form (see image), enter the following information : Field name Type Description Email nvarchar(200) The email address used to send emails. It will be used when connecting to the SMTP host. Password nvarchar(200) The password of the email. SMTP Host nvarchar(200) Simple Mail Transfer Protocol (SMTP) host (server) used to send an email on behalf of the email address. Port int SMTP host's port to connect to. Enable SSL bit Checked if the SMTP host requires to use SSL connectivity. Please request to your email provider the SMTP server configuration for your email address used to send emails from openIMIS. 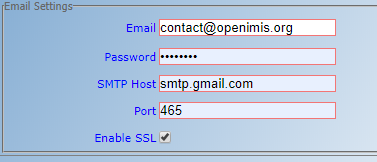
WA6. Building of registers
In order to use openIMIS, you need to configure the Insurance related registers based on the implementation context. This configuration of the registers (also called the Master Data) can be done in different ways.
- WA6.1 Bulk uploads from Web Application user interface
- WA6.2 Use the Database Import Tool
- WA6.3 Manual configuration
WA6.1 Bulk uploads from Web Application user interface
Implementation-related information can be configured in different ways. The user documentation explains bulk upload/download functionality of in general. In this page, we give examples of register files that can use by the functionality. The bulk upload/download functionality can be accessed through the menu Tools → Registers. Because the diagnoses list can be quite long, the configuration of the diagnoses in openIMIS Web Application can be done only by uploading the list encoded as an XML document. DTD definition of the XML file for uploading/downloading of diagnoses is: An example of an XML file that uses and conforms to this DTD follows. A ready to use ICD10 first-level diagnoses list can be downloaded here: ICD10.xml To upload the diagnoses list please follow the instruction in the user manual. If there are errors in the diagnoses list or you want to add/remove diagnoses, the easier is to download the current list, do the modifications and upload the list again. The list of locations can be configured in different ways. The simplest and intuitive way is through the user interface. In this section, we explain how to configure the locations by uploading the list formatted as an XML document. DTD definition of the XML file for uploading/downloading of locations is: An example of an XML file that uses and conforms to this DTD follows. To upload the location list please follow the instruction in the user manual. If there are errors in the location list or you want to add/remove locations, the easier is to edit from the user interface by accessing Administration → Locations from the menu. As for the locations, the health facilities can be configured in different ways and the most intuitive and simple way is through the user interface. In this section, we explain how to configure the health facilities by uploading the list formatted as an XML document. DTD definition of the XML file for uploading/downloading of health facilities is: An example of an XML file that uses and conforms to this DTD follows. To upload the health facilities list please follow the instruction in the user manual. If there are errors in the location list or you want to add/remove locations, the easier is to edit from the user interface by accessing Administration → Health Facilities from the menu.Upload diagnoses
<!DOCTYPE Diagnoses [
	<!ELEMENT Diagnoses (Diagnosis*)>
	<!ELEMENT Diagnosis (DiagnosisCode, DiagnosisName)>
	<!ELEMENT DiagnosisCode (#CDATA)>
	<!ELEMENT DiagnosisName (#CDATA)>
]>
<?xml version="1.0" encoding="utf-8"?>
<Diagnoses>
	<Diagnosis>
		<DiagnosisCode>A00</DiagnosisCode>
		<DiagnosisName>Cholera</DiagnosisName>
	</Diagnosis>
	<Diagnosis>
		<DiagnosisCode>A01</DiagnosisCode>
		<DiagnosisName>Typhoid and paratyphoid fevers</DiagnosisName>
	</Diagnosis>
	<Diagnosis>
		<DiagnosisCode>A02</DiagnosisCode>
		<DiagnosisName>Other salmonella infections</DiagnosisName>
	</Diagnosis>
	<Diagnosis>
		<DiagnosisCode>A03</DiagnosisCode>
		<DiagnosisName>Shigellosis</DiagnosisName>
	</Diagnosis>
	<Diagnosis>
		<DiagnosisCode>A04</DiagnosisCode>
		<DiagnosisName>Other bacterial intestinal infections</DiagnosisName>
	</Diagnosis>
	<Diagnosis>
		<DiagnosisCode>A05</DiagnosisCode>
		<DiagnosisName>Other bacterial foodborne intoxications, not elsewhere classified</DiagnosisName>
	</Diagnosis>
	<Diagnosis>
		<DiagnosisCode>A06</DiagnosisCode>
		<DiagnosisName>Amebiasis</DiagnosisName>
	</Diagnosis>
</Diagnoses>
Upload locations
<!DOCTYPE Locations [
	<!ELEMENT Locations (Regions, Districts, Municipalities, Villages)>
	<!ELEMENT Regions (Region*)>
	<!ELEMENT Region (RegionCode, RegionName)>
	<!ELEMENT RegionCode (#CDATA)>
	<!ELEMENT RegionName (#CDATA)>
	<!ELEMENT Districts (District*)>
	<!ELEMENT District (RegionCode, DistrictCode, DistrictName)>
	<!ELEMENT RegionCode (#CDATA)>
	<!ELEMENT DistrictCode (#CDATA)>
	<!ELEMENT DistrictName (#CDATA)>
	<!ELEMENT Municipalities (Municipality*)>
	<!ELEMENT Municipality (DistrictCode, MunicipalityCode, MunicipalityName)>
	<!ELEMENT DistrictCode (#CDATA)>
	<!ELEMENT MunicipalityCode (#CDATA)>
	<!ELEMENT MunicipalityName (#CDATA)>
	<!ELEMENT Villages (Village*)>
	<!ELEMENT Village (MunicipalityCode, VillageCode, VillageName, MalePopulation?, FemalePopulation?, OtherPopulation, Families?)>
	<!ELEMENT MunicipalityCode (#CDATA)>
	<!ELEMENT VillageCode (#CDATA)>
	<!ELEMENT VillageName (#CDATA)>
	<!ELEMENT MalePopulation (#CDATA)>
	<!ELEMENT FemalePopulation (#CDATA)>
	<!ELEMENT OtherPopulation (#CDATA)>
	<!ELEMENT Families (#CDATA)>
]>
<?xml version="1.0" encoding="utf-8"?>
<Locations>
  <Regions>
    <Region>
      <RegionCode>R1</RegionCode>
      <RegionName>Ultha</RegionName>
    </Region>
    <Region>
      <RegionCode>R2</RegionCode>
      <RegionName>Tahida</RegionName>
    </Region>
  </Regions>
  <Districts>
    <District>
      <RegionCode>R1</RegionCode>
      <DistrictCode>R1D1</DistrictCode>
      <DistrictName>Rapta</DistrictName>
    </District>
    <District>
      <RegionCode>R2</RegionCode>
      <DistrictCode>R2D1</DistrictCode>
      <DistrictName>Rajo</DistrictName>
    </District>
  </Districts>
  <Municipalities>
    <Municipality>
      <DistrictCode>R2D1</DistrictCode>
      <MunicipalityCode>R2D1M1</MunicipalityCode>
      <MunicipalityName>Jaber</MunicipalityName>
    </Municipality>
    <Municipality>
      <DistrictCode>R1D1</DistrictCode>
      <MunicipalityCode>R1D1M2</MunicipalityCode>
      <MunicipalityName>Jamu</MunicipalityName>
    </Municipality>
    <Municipality>
      <DistrictCode>R1D1</DistrictCode>
      <MunicipalityCode>R1D1M3</MunicipalityCode>
      <MunicipalityName>Adhi</MunicipalityName>
    </Municipality>
  </Municipalities>
  <Villages>
    <Village>
      <MunicipalityCode>R2D1M1</MunicipalityCode>
      <VillageCode>R2D1M1V1</VillageCode>
      <VillageName>Utha</VillageName>
      <MalePopulation>0</MalePopulation>
      <FemalePopulation>0</FemalePopulation>
      <OtherPopulation>0</OtherPopulation>
      <Families>0</Families>
    </Village>
	<Village>
      <MunicipalityCode>R1D1M2</MunicipalityCode>
      <VillageCode>R1D1M2V1</VillageCode>
      <VillageName>Jamula</VillageName>
      <MalePopulation>0</MalePopulation>
      <FemalePopulation>0</FemalePopulation>
      <OtherPopulation>0</OtherPopulation>
      <Families>0</Families>
    </Village>
	<Village>
      <MunicipalityCode>R1D1M3</MunicipalityCode>
      <VillageCode>R1D1M3V1</VillageCode>
      <VillageName>Rathula</VillageName>
      <MalePopulation>0</MalePopulation>
      <FemalePopulation>0</FemalePopulation>
      <OtherPopulation>0</OtherPopulation>
      <Families>0</Families>
    </Village>
  </Villages>
</Locations>
Upload health facilities
<!DOCTYPE HealthFacilities [
	<!ELEMENT HealthFacilities (HealthFacilityDetails, CatchmentsDetails)>
	<!ELEMENT HealthFacilityDetails (HealthFacility*)>
	<!ELEMENT HealthFacility (LegalForm, Level, Sublevel, Code, Name, Address, DistrictCode, DistrictName, Phone, Fax, Email, CareType, AccountCode, ItemPriceListName, ServicePricelistName)>
	<!ELEMENT LegalForm (D|C|G|P)> 	<!-- District organization | Charity | Government | Private organization -->
	<!ELEMENT Level (D|C|H)> 			<!-- Dispensary | Health Centre | Hospital -->
	<!ELEMENT SubLevel (I|N|R)>		<!-- Integrated | No Sublevel | Reference -->
	<!ELEMENT Code (#CDATA)>
	<!ELEMENT Name (#CDATA)>
	<!ELEMENT Address (#CDATA)>
	<!ELEMENT DistrictCode (#CDATA)>
	<!ELEMENT DistrictName (#CDATA)>
	<!ELEMENT Phone (#CDATA)>
	<!ELEMENT Fax (#CDATA)>
	<!ELEMENT Email (#CDATA)>
	<!ELEMENT CareType (I|O|B)>		<!-- In-Patient | Out-Patient | Both -->
	<!ELEMENT AccountCode (#CDATA)>
	<!ELEMENT ItemPriceListName (#CDATA)>
	<!ELEMENT ServicePriceListName (#CDATA)>
	<!ELEMENT CatchmentsDetails (Catchment*)>
	<!ELEMENT Catchment (HFCode, VillageCode, VillageName, Percentage)>
	<!ELEMENT HFCode (#CDATA)>
	<!ELEMENT VillageCode (#CDATA)>
	<!ELEMENT VillageName (#CDATA)>
	<!ELEMENT Percentage (#CDATA)>
]>
<?xml version="1.0" encoding="utf-8"?>
<HealthFacilities>
  <HealthFacilityDetails>
    <HealthFacility>
      <LegalForm>G</LegalForm>
      <Level>H</Level>
      <SubLevel />
      <Code>JMHOS001</Code>
      <Name>Jambero District Hospital</Name>
      <Address>Lantern Road 21 P.O.Box 3425</Address>
      <DistrictCode>R1D2</DistrictCode>
      <DistrictName>Jambero</DistrictName>
      <Phone />
      <Fax />
      <Email />
      <CareType>B</CareType>
      <AccountCode>DL0002</AccountCode>
      <ItemPriceListName>Ultha Govt. Hospital List</ItemPriceListName>
      <ServicePriceListName>Ultha Govt. Hospital List</ServicePriceListName>
    </HealthFacility>
    <HealthFacility>
      <LegalForm>G</LegalForm>
      <Level>C</Level>
      <SubLevel />
      <Code>JMHC001</Code>
      <Name>Jamini Health Centre</Name>
      <Address>Reduci road 42</Address>
      <DistrictCode>R1D2</DistrictCode>
      <DistrictName>Jambero</DistrictName>
      <Phone />
      <Fax />
      <Email />
      <CareType>O</CareType>
      <AccountCode />
      <ItemPriceListName>Ultha Govt. Health Centre List</ItemPriceListName>
      <ServicePriceListName>Ultha Govt. Health Centre List</ServicePriceListName>
    </HealthFacility>
    <HealthFacility>
      <LegalForm>G</LegalForm>
      <Level>D</Level>
      <SubLevel />
      <Code>JMDP001</Code>
      <Name>Huda Dispensary</Name>
      <Address>Jolywel road 675</Address>
      <DistrictCode>R1D2</DistrictCode>
      <DistrictName>Jambero</DistrictName>
      <Phone />
      <Fax />
      <Email />
      <CareType>O</CareType>
      <AccountCode />
      <ItemPriceListName>Ultha Govt. Dispensary List</ItemPriceListName>
      <ServicePriceListName>Ultha Govt. Dispensary List</ServicePriceListName>
    </HealthFacility>
  </HealthFacilityDetails>
  <CatchmentDetails>
    <Catchment>
      <HFCode>JMDP001</HFCode>
      <VillageCode>R1D2M2V1</VillageCode>
      <VillageName>Agilo</VillageName>
      <Percentage>100</Percentage>
    </Catchment>
    <Catchment>
      <HFCode>JMDP001</HFCode>
      <VillageCode>R1D2M1V1</VillageCode>
      <VillageName>Holobo</VillageName>
      <Percentage>100</Percentage>
    </Catchment>
    <Catchment>
      <HFCode>JMDP001</HFCode>
      <VillageCode>R1D2M1V2</VillageCode>
      <VillageName>Octo</VillageName>
      <Percentage>100</Percentage>
    </Catchment>
    <Catchment>
      <HFCode>JMDP001</HFCode>
      <VillageCode>R1D2M1V3</VillageCode>
      <VillageName>Raberjab</VillageName>
      <Percentage>100</Percentage>
    </Catchment>
  </CatchmentDetails>
</HealthFacilities>
WA6.2 Use the Database Import Tool
Implementation-related information can be configured in different ways: through bulk upload/download, through the Web Application user interface. In this page, we explain how to use the openIMIS Database Import Tool to manually import the information directly into the database. openIMIS Database Import Tool The openIMIS Database Import Tool is a spreadsheet that allows Implementers to define the list of medical items, medical services, diagnoses and health facilities. With the help of a Database Manager, the lists can be then imported directly into the database by executing the generated SQL scripts. The openIMIS Database Import Tool can be downloaded from Github openIMIS Database repository. How to use the Database Import Tool Open the Registers_init.ods Each tab corresponds to a register e.g. tblHF for Health Facilities Delete the sample data from the template Insert the data to be imported into openIMIS (the comments allows to understand how the data should be codded) SQL insert statements are generated in the same worksheet as data is typed in Copy those statement in the database manager (e.g. SQL Server management studio) and run them
WA6.3 Manual configuration
We have seen in the previous sections two ways of configuring openIMIS insurance-related information through bulk uploads and by inserting directly in the database. The most common way to do the configuration is through the Web Application user interface. This manual configuration is explained in the user manual. The diagnostics can only be configured through bulk uploads. Based on the dependencies between openIMIS entities, we suggest that you follow this order in the manual configuration process: User creation (dependent on User roles and Location) Payers (if contributions are not paid by the insurees; dependent on Location) Medical Services Price Lists (dependent on Location and Medical Services) Medical Items Price Lists (dependent on Location and Medical Items) Health Facilities (dependent on Location, Medical Services Price List and Medical Items Price List) Insurance Products (dependent on Location, Medical Services and Medical Items) Enrolment Officers (dependent on Location) Claim Administrators (dependent on Location)