Prerequisites In order to install openIMIS REST API, you need first to install openIMIS Database and openIMIS Web Application. If not yet installed, please follow the steps from the database installation and web application installation guides. Download openIMIS REST API Download and unzip the release from Github rest_api_c-sharp repository under the IIS' wwwroot (C:\inetpub\wwwroot). Install required libraries openIMIS REST API is developed in the .NET Core open-source framework. Download and install the required libraries for .NET Core 2.21. Configure openIMIS REST API in IIS The openIMIS REST API can be installed as a separate website or as an application within the openIMIS Web Application website. The following instructions are for the second case. In Internet Information Service (IIS) Manager, right-click on the openIMIS Web Application website and select Add application. Fill in the form as follows: Configure openIMIS REST API Edit appsettings.Production.json file: | Code Block |
|---|
| {
"ConnectionStrings": {
"IMISDatabase": "Server=Server;Database=IMIS;User ID=User;Password=Password"
},
"JwtIssuer": "http://openimis.org",
"JwtAudience": "http://openimis.org",
"JwtExpireDays": 365
} |
ConnectionStrings.IMISDatabase: the databased link and credentials. In case the server name is under the form "ServerName\SQLInstanceName", you will need to use double '\': "ServerName\\SQLInstanceName" JwtIssuer, JwtAudience: the authentification token validation information JwtExpireDays: the number of days the authentification token will be valid after its delivery
Edit appsettings.json file: | Code Block |
|---|
| {
"JwtIssuer": "http://openimis.org",
"JwtAudience": "http://openimis.org",
"JwtExpireDays": 5,
"Logging": {
"IncludeScopes": false,
"Debug": {
"LogLevel": {
"Default": "Warning"
}
},
"Console": {
"LogLevel": {
"Default": "Warning"
}
}
},
"AppPrefixDir": "/rest",
"AppSettings": {
"FromPhone_Renewal": "\\FromPhone\\Renewal\\",
"FromPhone_Renewal_Rejected": "\\FromPhone\\Renewal\\Rejected\\",
"FromPhone_Claim": "\\FromPhone\\Claim\\",
"FromPhone_Claim_Rejected": "\\FromPhone\\Claim\\Rejected\\",
"FromPhone_Feedback": "\\FromPhone\\Feedback\\",
"FromPhone_Feedback_Rejected": "\\FromPhone\\Feedback\\Rejected\\",
"Extracts_Phone": "\\Extracts\\Phone\\",
"Enrollment_Phone": "\\FromPhone\\Enrollment\\",
"Extracts_Offline": "\\Extracts\\Offline\\",
"JsonDebugFolder": "\\FromPhone\\Enrollment\\Debug\\",
"SubmittedFolder": "\\Images\\Submitted\\",
"UpdatedFolder": "\\Images\\Updated\\",
"SmsStrings": "\\Escape\\Sms\\Strings\\",
"SmsStringsSecondary": "\\Escape\\Sms\\StringsSecondaryLanguage\\"
},
"SmsGateWay": null
} |
JwtIssuer, JwtAudience, JwtExpireDays: are overridden by appsettings.Production.json. Logging: no need to modify this AppPrefixDir: equivalent to the alias configured in IIS preceded by '/'; empty if configured as website and not application in IIS AppSettings: these settings are the same as in the Web Application Web.config file SmsGateWay: required by the ePayment module and depends on the actual implementation
Add rewrite rule for Image folder The Image folder is used by both Web Application and Mobile Applications. Usually, we keep only one folder for all the images under the Web Application folder. From the mobile phone, the Images path is added to the configured REST API base URL which doesn't exist. Based on the previous configurations, add the following URL rewrite rule. 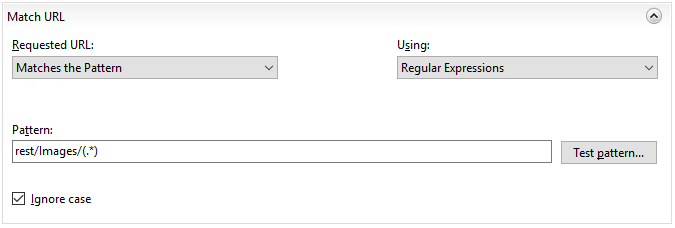 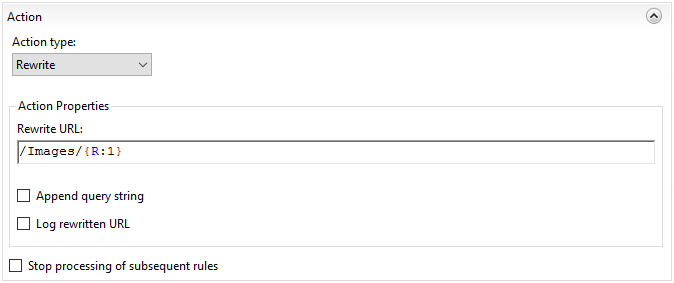 Test the installed REST API To access and test the newly installed REST API, open your browser and navigate to http://127.0.0.1/rest/api-docs. openIMIS demo server REST API For testing purposes, you can access the openIMIS demo server REST API: https://demo.openimis.org/rest/api-docs/index.html?urls.primaryName=V2%20Docs |